Using NOMAD in the CRC1415
In this tutorial, we follow the entire workflow for uploading, sharing and publishing research data in NOMAD via the graphical user interface (GUI). We will focus on the NOMAD-CRC1415-Plugin for collecting measurement data of a sample and the corresponding workflow. By the end of the tutorial, we will set-up an upload and sharing data within the CRC1415.
Before you proceed, make sure you have read the tutorial about Upload and publish your own data
What you will learn
In this tutorial, you will learn how to:
- Upload raw research data to NOMAD and organize it using uploads
- View the entries that NOMAD generates from your files and check their processing status
- Share uploads with collaborators and manage access permissions
- Publish uploads and understand the restritions
Before you begin
This tutorial requires no prior experience with NOMAD except the basic concepts explained in the previous tutorial.
Before starting, make sure you have the following:
-
ZIH@TUD user account for NOMAD Oasis CRC1415
In order to upload data into NOMAD Oasis for the CRC1415, a user account is required. You need to have ZIH-login. If you don't have one, reach out to your contact person requesting a guest login. -
Example files available on your local machine
This tutorial uses provided example data files for:
Login to NOMAD Oasis CRC1415
A ZIH-login user account is required if you want to upload, share, publish, or analyze your data.
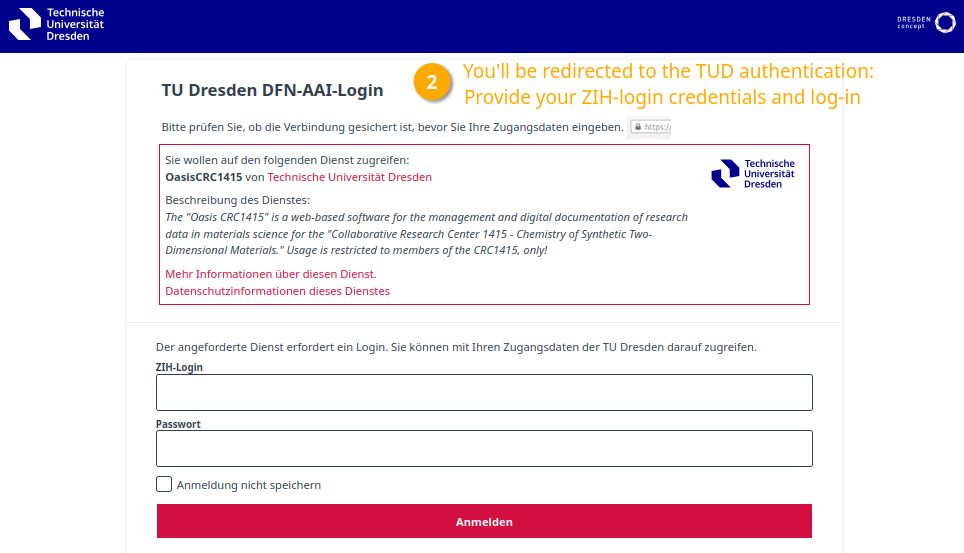
Use the arrow buttons ⬅️➡️ below to slide through the steps and login with your ZIH-account into NOMAD Oasis CRC1415.


Create new upload
The uploads exist in the Your uploads page. Here you can view a list of all your uploads with their relevant information. You can also create new uploads or add an example upload prepared by others.
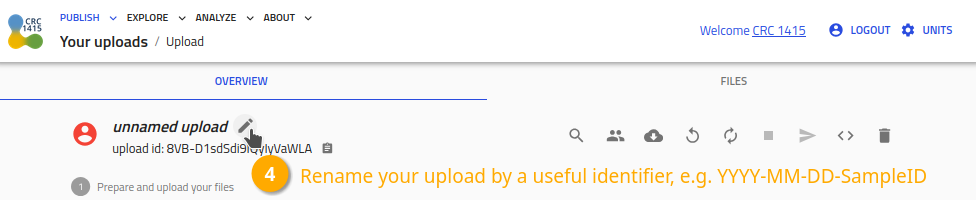
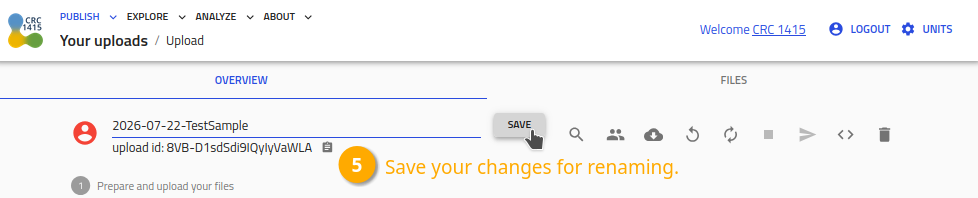
Use the arrow buttons ⬅️➡️ below to follow the steps for creating your first upload.


Two different views of the upload page
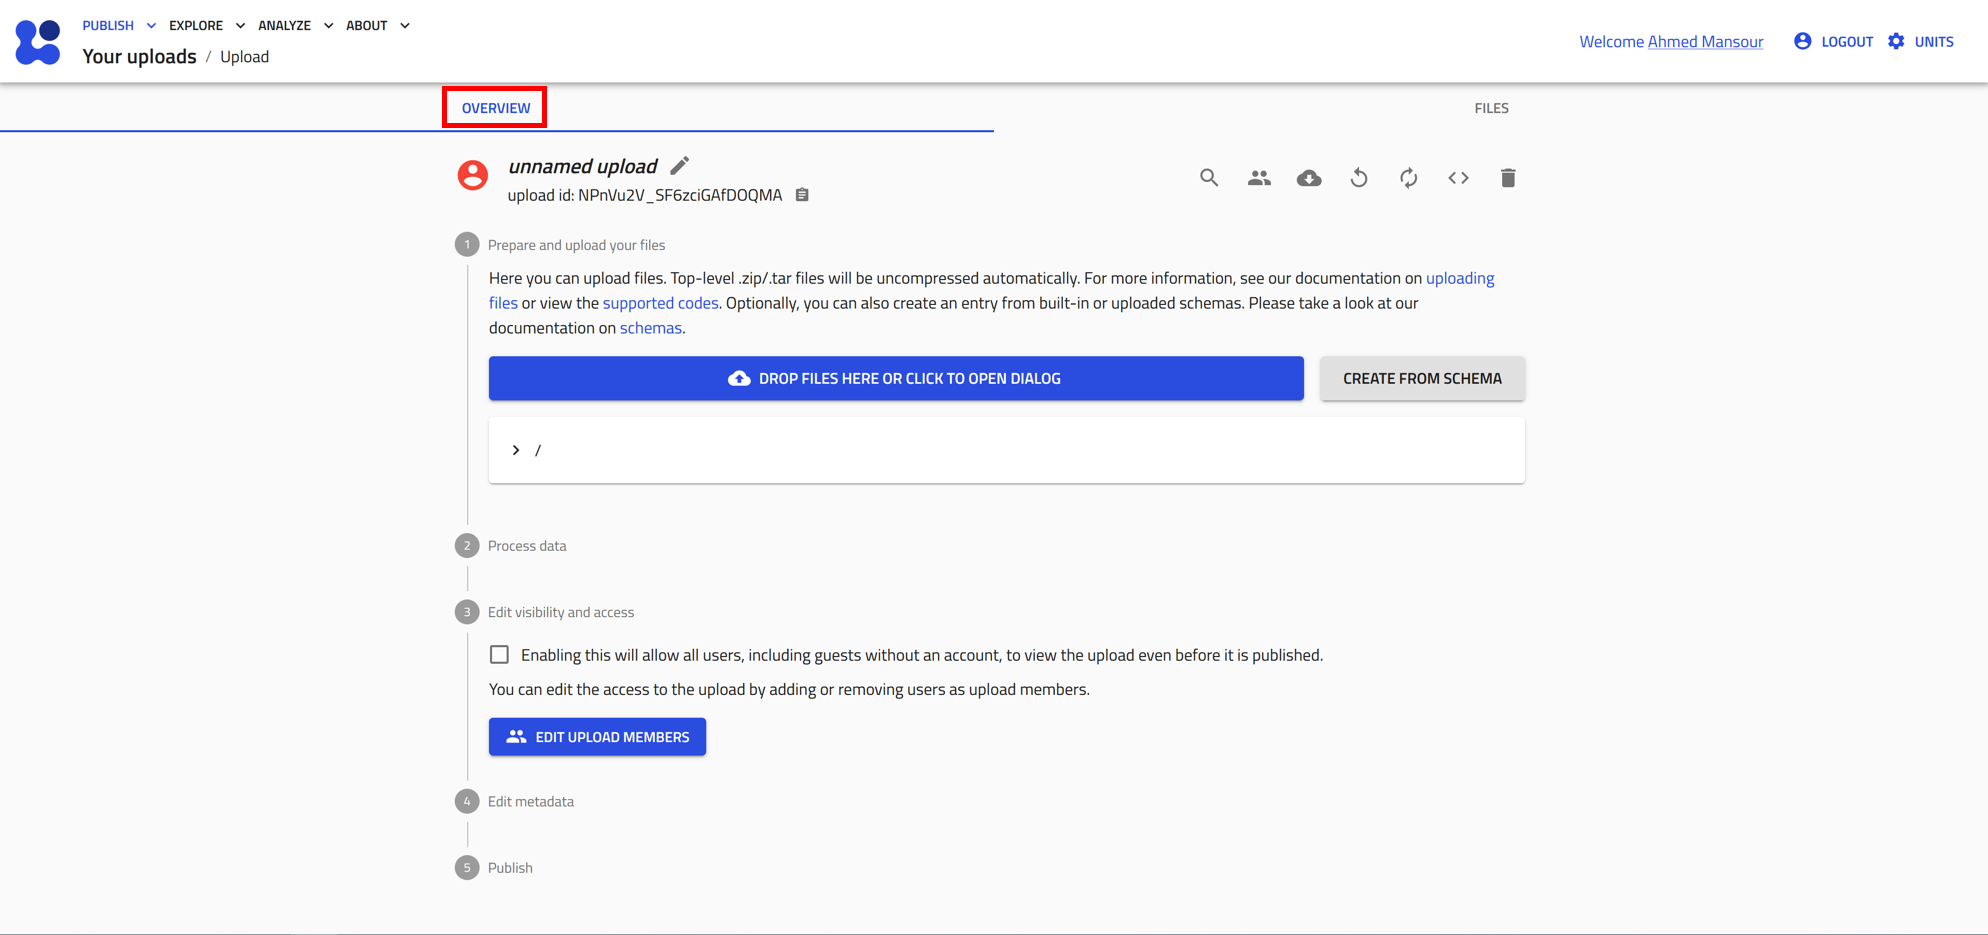
At the very top of the upload page, you can toggle between two different views for this page:
- Overview: This view includes all the tools needed to manage your upload, along with guided steps to start uploading your files to NOMAD. It will also show all the processed files (entries) that you will upload.
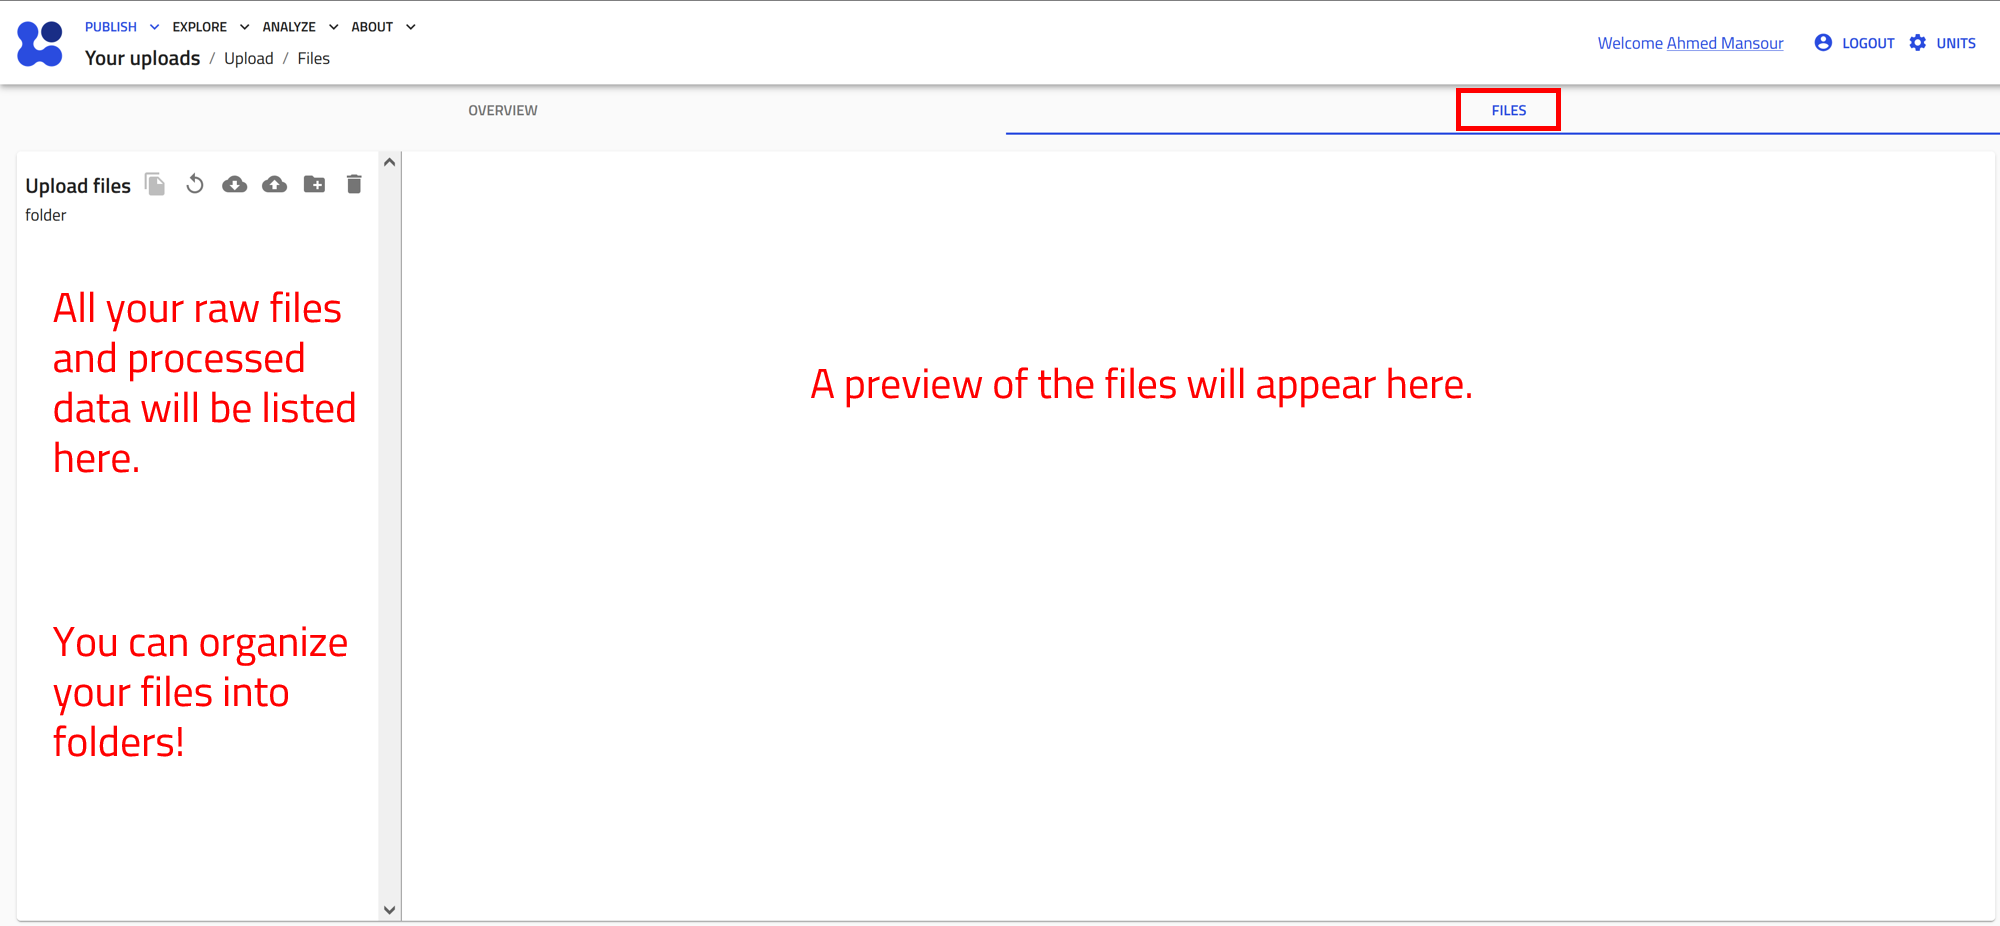
- Files: This view shows all the files included in the upload, whether they are raw files or processed files. You can also organize these files into folders as needed.
Icons on the upload overview
At the top of the OVERVIEW tab, you will find several icons that help you to manage your upload:

The name of the upload can be modified by clicking on the pen icon . The other icons are used as follows:
Manage members: Allows users to invite collaborators by assigning co-authors and reviewers roles.
Download files: Downloads all files present in the upload.
Reload: Reloads the uploads page.
Reprocess: Triggers the uploaded data to be processed again.
API: Displays a GET request url and corresponding JSON response demonstrating how to access the entries of the upload via the NOMAD API and the expected result, respectively.
Delete the upload: Deletes the upload permanently.
Components of the upload overview
The remainder of the uploads page is divided into five segments, each presenting a step in the uploading and publishing process:
1. Prepare and upload your files: displays the files and folder structure of the upload. You can add a README.md file to the root directory and its contents will be shown above this section.
2. Process data: shows the processed data and the generated entries in NOMAD.
3. Edit visibility and access: allows users to make the upload public or share it with specific users before publishing.
4. Edit author metadata: allows users to edit certain metadata fields from all entries recognized in the upload. This includes comments, where you can add as much extra information as you want, references, where you can add a URL to your upload (e.g., an article DOI), and datasets, where you can link the uploaded data to other uploads to define a larger-scale organizational structure (see Group entries into a dataset below.)
5. Publish: lets users publish data with or without an embargo (i.e., a waiting period before the data are publicly visible).
Share and publish uploads
Uploads in NOMAD can be shared or published. When an upload is shared or published, all entries and files contained within it are also shared or published.
What is the difference between sharing and publishing an Upload?
Sharing an upload allows you to grant access to colleagues or collaborators while working on it.
- This facilitates collaboration on projects or enables progress reviews during the project.
- You can invite individuals with either read/write access (coauthors) or read-only access (reviewers).
Publishing an upload makes it searchable, findable, and accessible on NOMAD for everyone.
- Once published, the upload becomes immutable, meaning its contents can no longer be modified.
- You also have the option to publish with an embargo period, temporarily restricting public access until the embargo expires.
A NOMAD upload can have four states based on sharing and publishing:
| Status | Icon | Description |
|---|---|---|
| Private |  |
The upload is private and is visible to the uploader only. |
| Shared |  |
The upload is accessible to selected users but not publicly available. |
| Published |  |
The upload is publicly available to everyone. |
| Visible |  |
The upload is unpublished but accessible to everyone. |
You can manage upload sharing in the Edit upload members menu. To access it, click on  available at the top of the upload page.
Alternatively, you can click the EDIT UPLOAD MEMBERS button below the list of entries on your upload page.
Share your upload
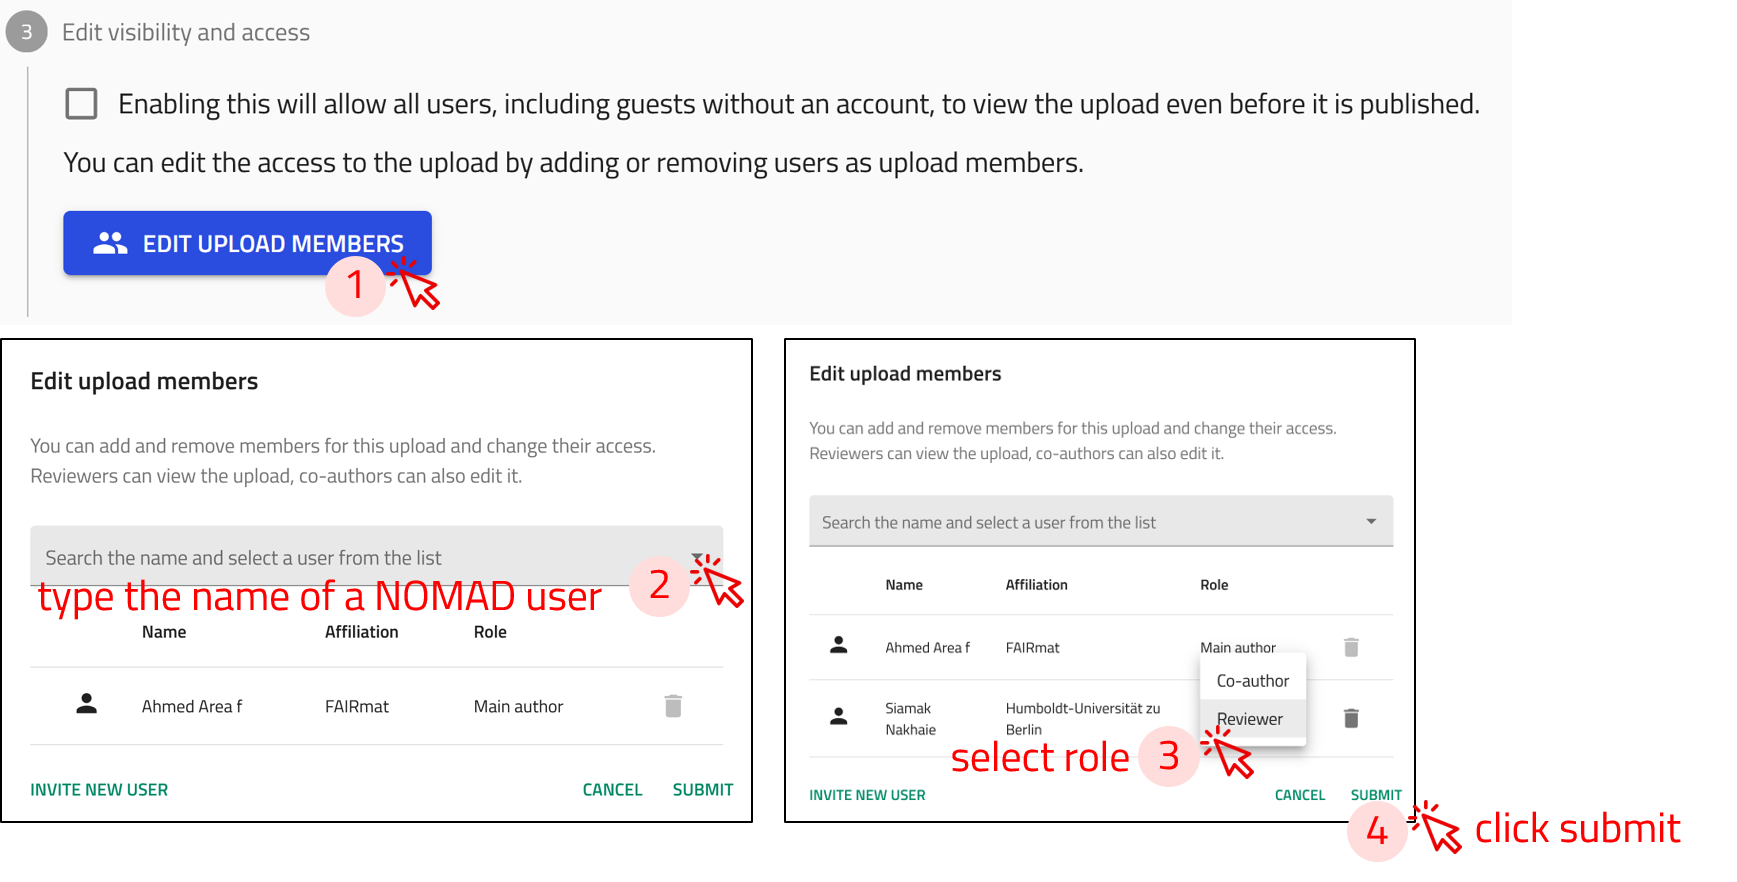
Step 1: Open the Edit upload members window, by clicking on the EDIT UPLOAD MEMBERS button.
Step 2: Start typing the name of the NOMAD user you want to share the upload with. A list of matching users will appear—select the correct name from the list.
Step 3: Assign a role to the user by selecting either Coauthor or Reviewer from the dropdown menu. - Coauthors can edit and add files to the upload. - Reviewers can only view the contents of the upload (no editing rights).
Step 4: Click on submit.
Make your upload visible to everyone
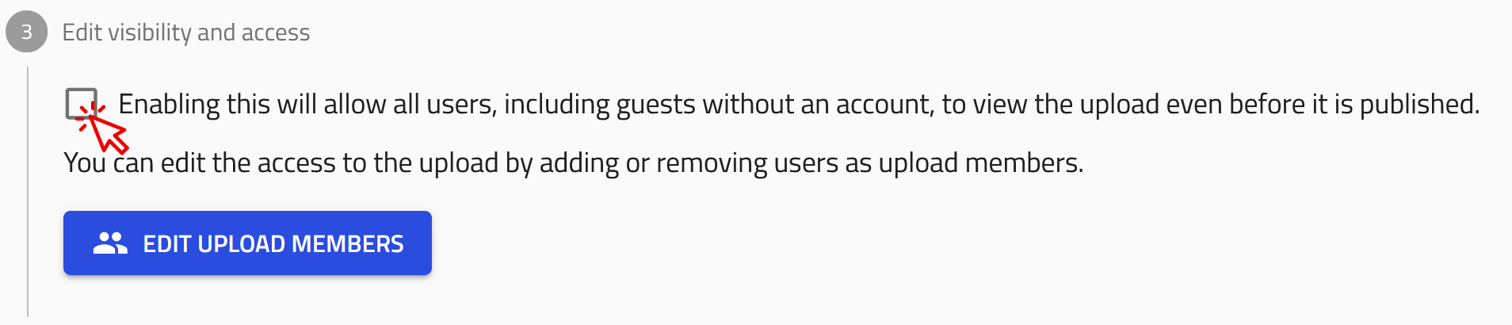
To make your upload visible to everyone on NOMAD, simply check the box in the Edit visibility and access section, located under the list of your entries.
This setting allows all users, including guests without an account, to view the upload even before it is published.
You can still modify the upload’s access settings and edit its contents while it remains visible.
Publish your upload
Once an upload is published, it cannot be deleted, and the files and entries cannot be changed
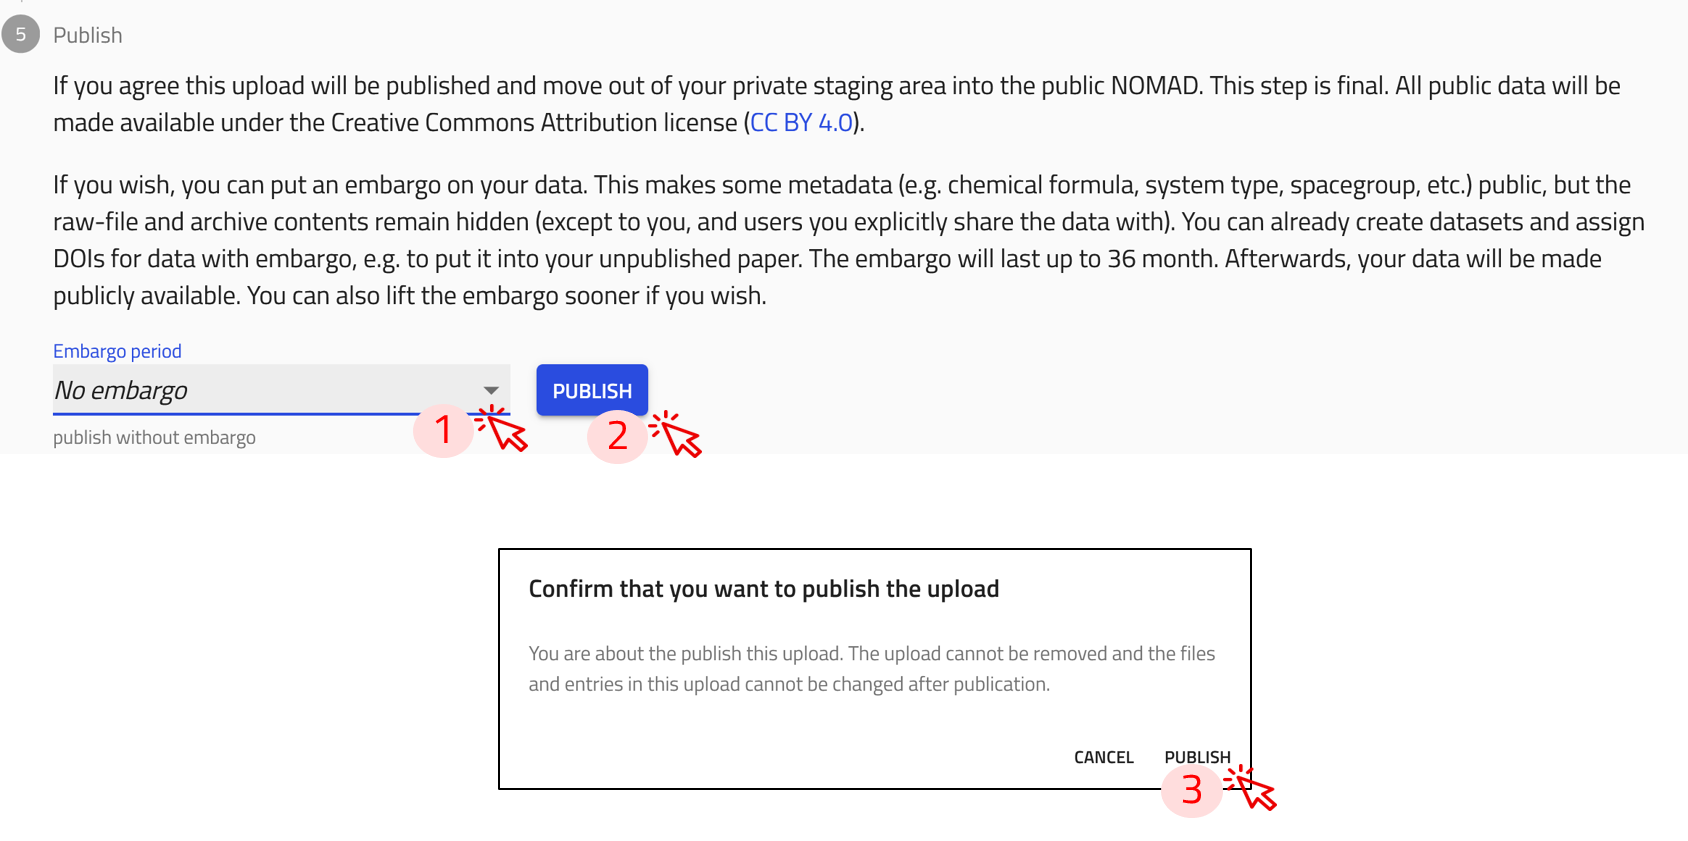
Step 1: Select an embargo period (if needed) from the dropdown menu, located in the publish section at the bottom of the upload page.
If you would like to publish immediately, select No embargo.
Step 2: Click on the PUBLISH button.
Step 3: A prompt for confirmation appears on the screen. Click on PUBLISH.
Having an embargo on your data means:
- Raw files and entries remain hidden, except to you and users you share the data with.
- Some metadata (e.g., chemical formula, system type, spacegroup) will be public.
- Embargoed entries can be added to datasets and be assigned DOIs.
- The embargo can be lifted earlier than the assigned duration by the user.
The following image shows an example of an embargoed upload and the option to lift the embargo by clicking the LIFT EMBARGO button.

Add files to an upload
Let's start adding files to your NOMAD upload. We will explore some examples:
- X-ray diffraction data file (RAW)
- Electron microscopy data (TIF)
- Raman spectroscopy data (TVB)
- Crystallographic Information File (CIF)
- ReadMe file in MarkDown (MD)
Files can be added to an upload individually, or you can group them into a compressed file in .zip or .tar formats.
Upload miscellaneous files
Download the example files for this exercise
- X-ray diffraction data file (RAW),
- Electron microscopy data (TIF),
- Raman spectroscopy data (TVB),
- Crystallographic Information File (CIF),
- README file (MD).
Download all files to a local folder on your machine in preferred directory.
The files have the following formats: .raw, .tvb, .tif, and .cif.
| file name | format | description |
|---|---|---|
| test_file_XRD.raw | .raw | Binary file of XRD data based on Bruker .raw format |
| test_file_Raman_TVB_10Frames.tvb | .tvb | Binary file of Raman data based on TriVista .tvb format |
| test_file_SEM_01.tif | .tif | A scanning electron microscope image |
| test_file_Overview_CIF.cif | .cif | Crystallographic Information File |
| README.md | .md | ReadMe file providing information about the upload in MarkDown |
Note that these files will not create entries in NOMAD, because a built-in parser for them doesn't exist. One exception is the README.md (Note the uppercase writing): This file will be used as preview on the upload page and can be used for explaining the content.
They will be stored in your upload and can be accessed and shared with your colleagues, however, they will not be searchable within NOMAD. In this case, NOMAD functions as a storage system, similar to a cloud drive.
You can add these files to your NOMAD upload. Do so by simply drag and drop the file or by opening the dialog to browse the files in your device.
Uploading files via drag and drop
Drag and drop
Start with uploading all files. Let's use the drag and drop method as shown in the animation below.
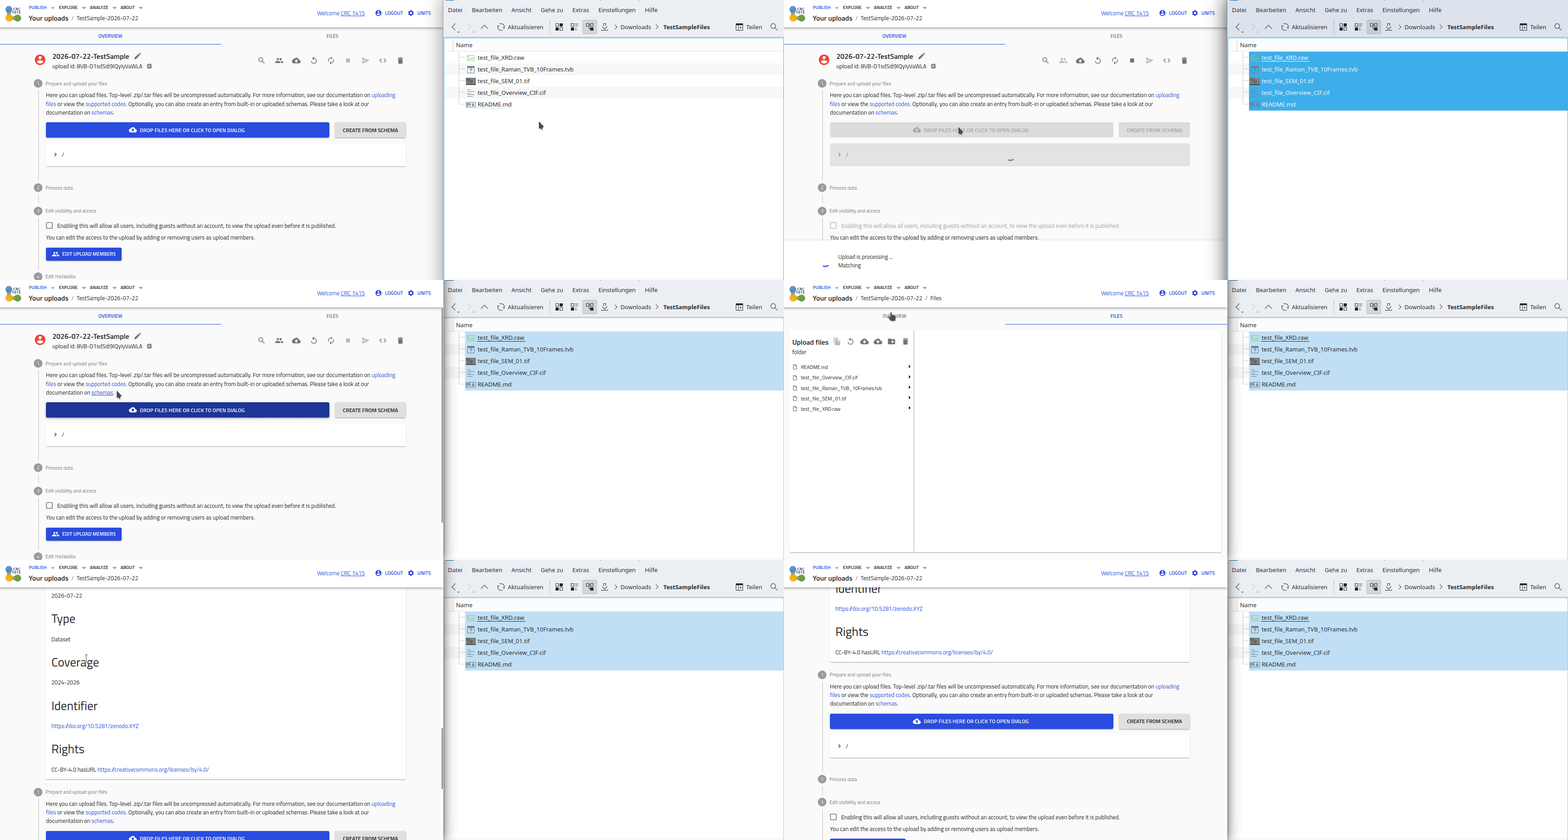
When a compressed .zip file is uploaded to NOMAD, it will be extracted automatically and the included files will be added to your upload.
Using NOMAD Oasis CRC1415 as ELN
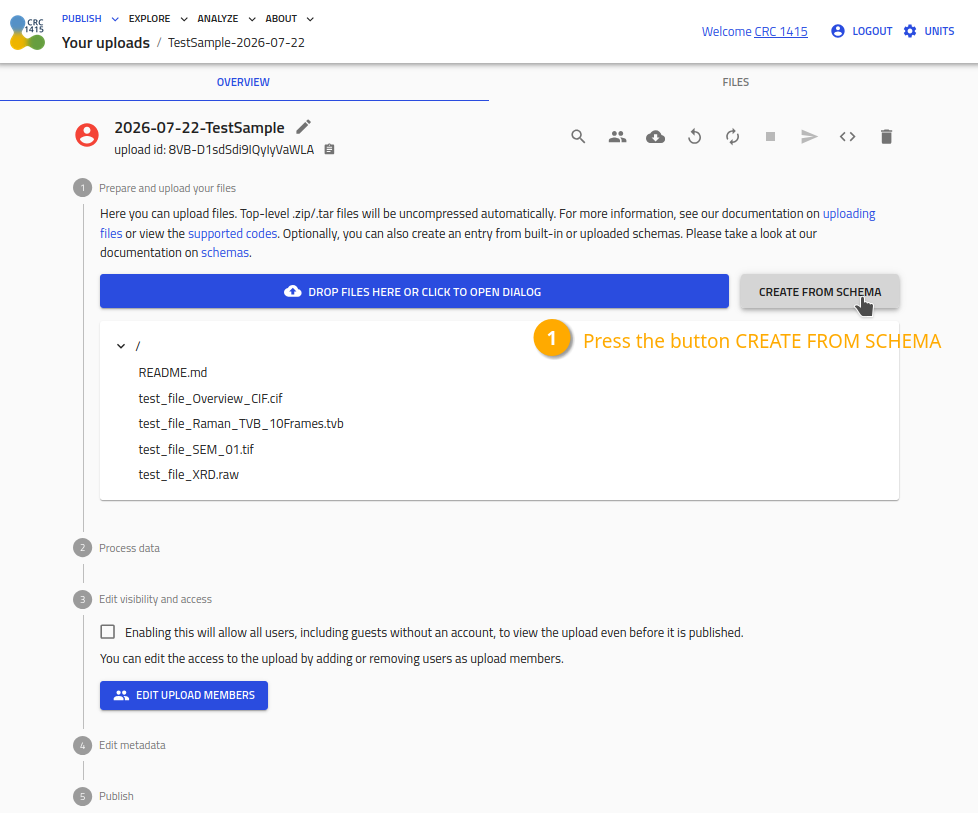
Beside the cloud-drive storage, NOMAD Oasis CRC1415 can be used as electronic lab notebook (ELN) to enrich your data with useful metadata making it FAIR. Furthermore the built-in CRC1415-Plugin contains customized metadata fields and specific parsers for common experiments in the CRC1415. To do so, perform these steps:
- Click on button "CREATE FROM SCHEMA"
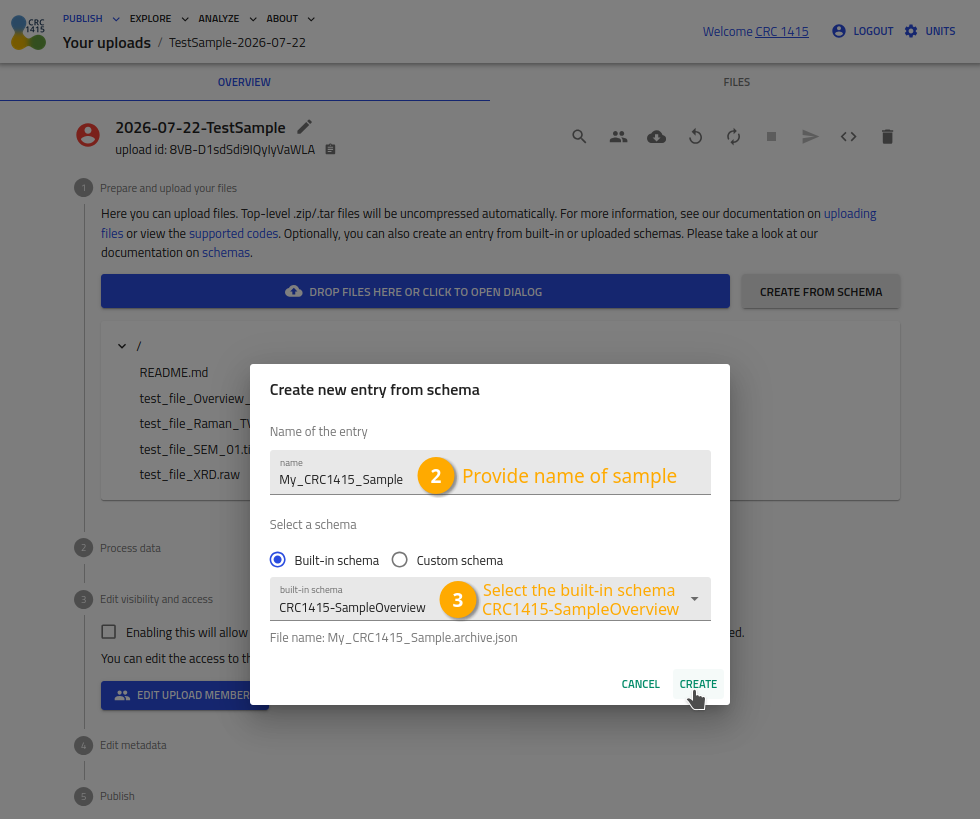
- Provide a name for the sample entry.
- Select the built-in schema "CRC1415-SampleOverview" and click "CREATE"
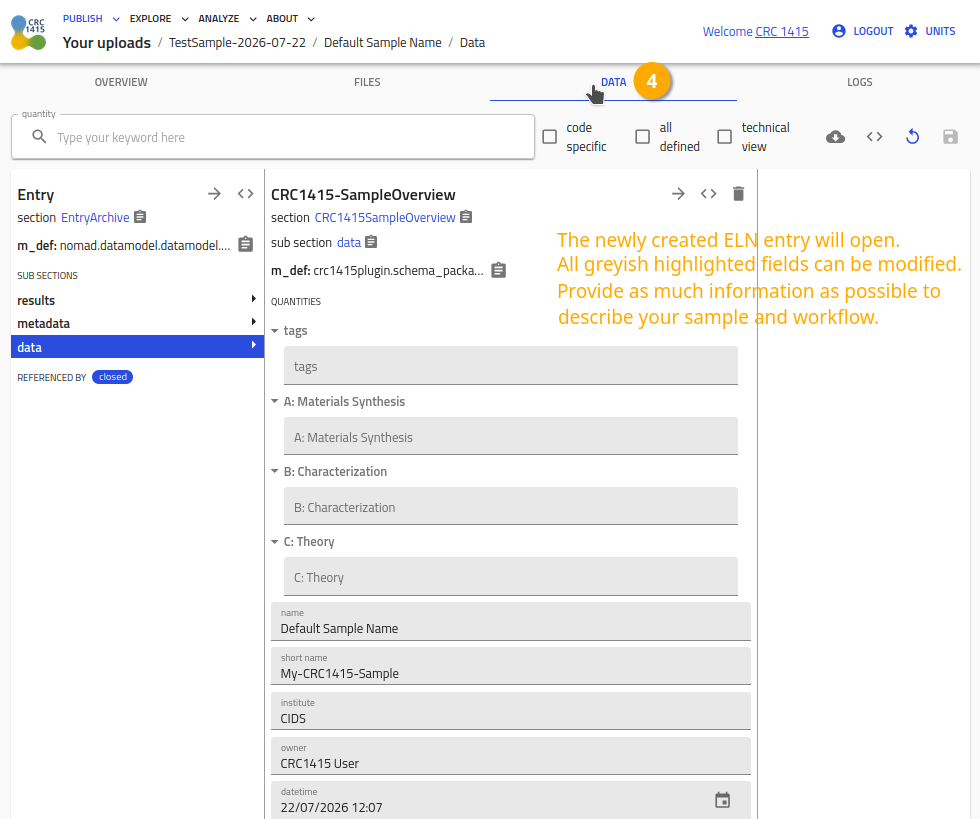
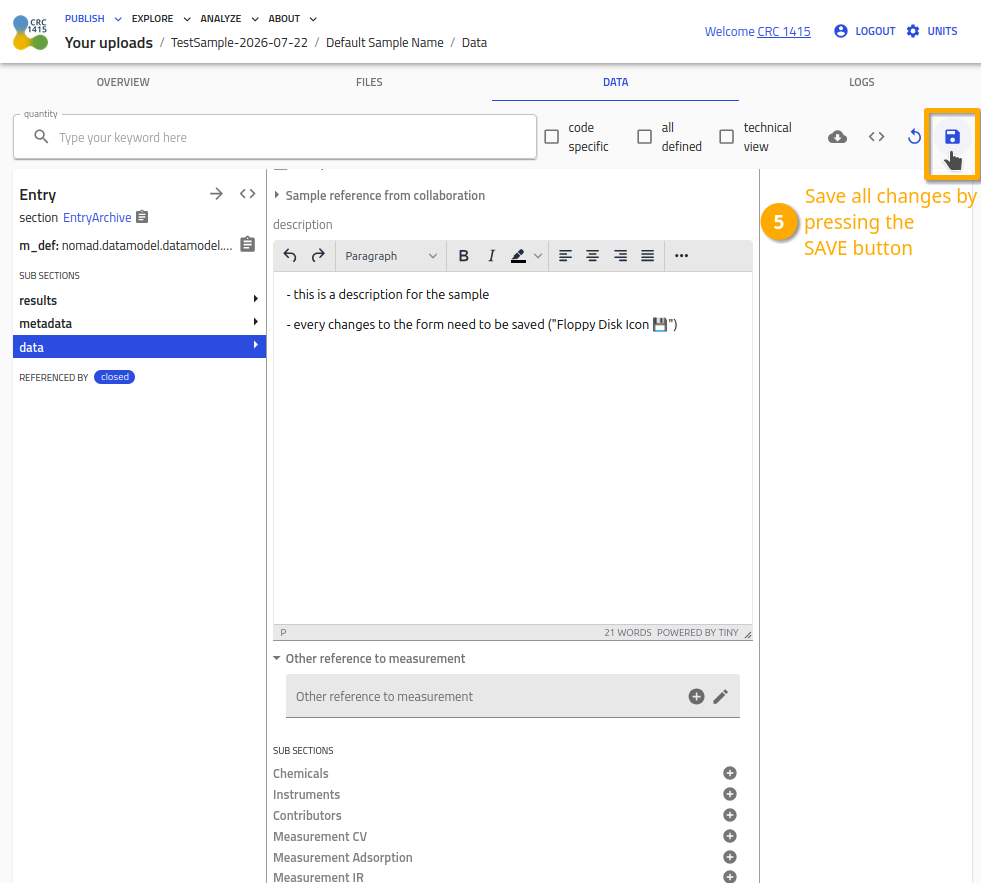
- Provide as much information as possible about your sample.
- When changing the form, save all changes by pressing the SAVE button!
Use the arrow buttons ⬅️➡️ below to follow the steps for creating your first ELN entry.
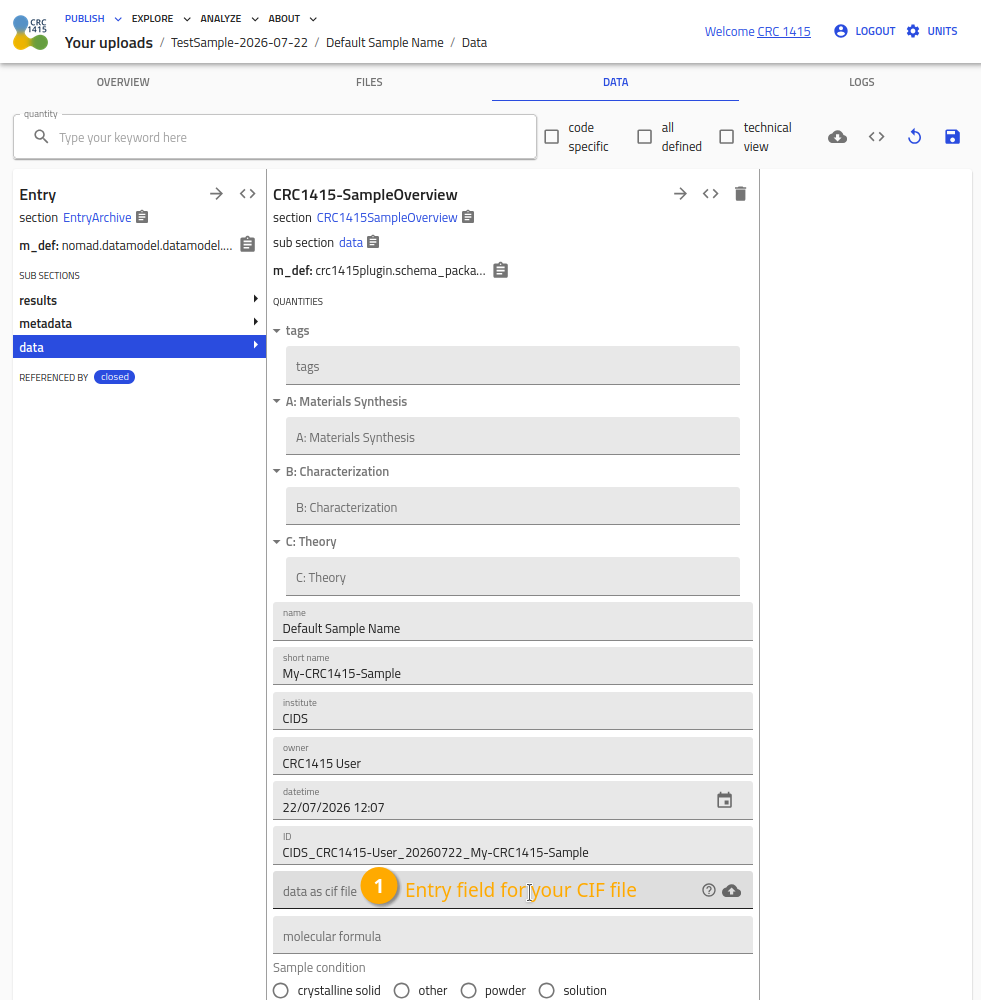
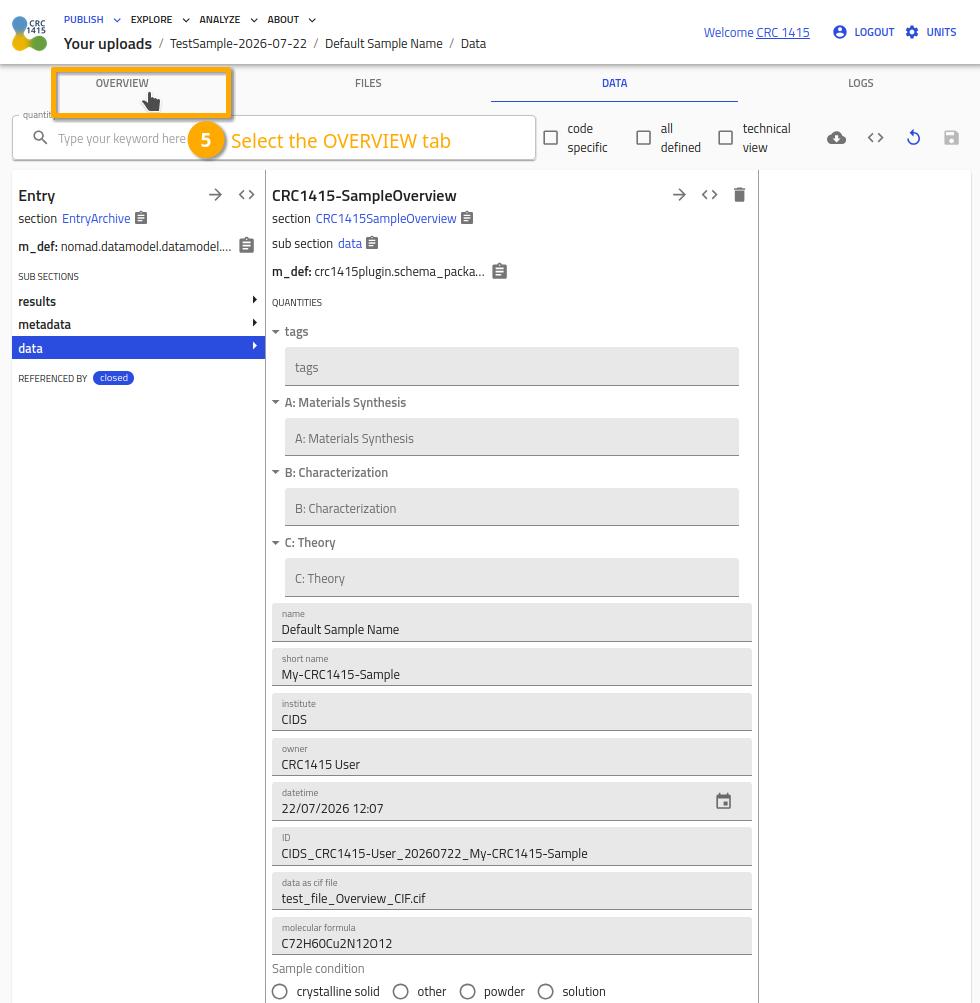
Providing chemical information based on CIF
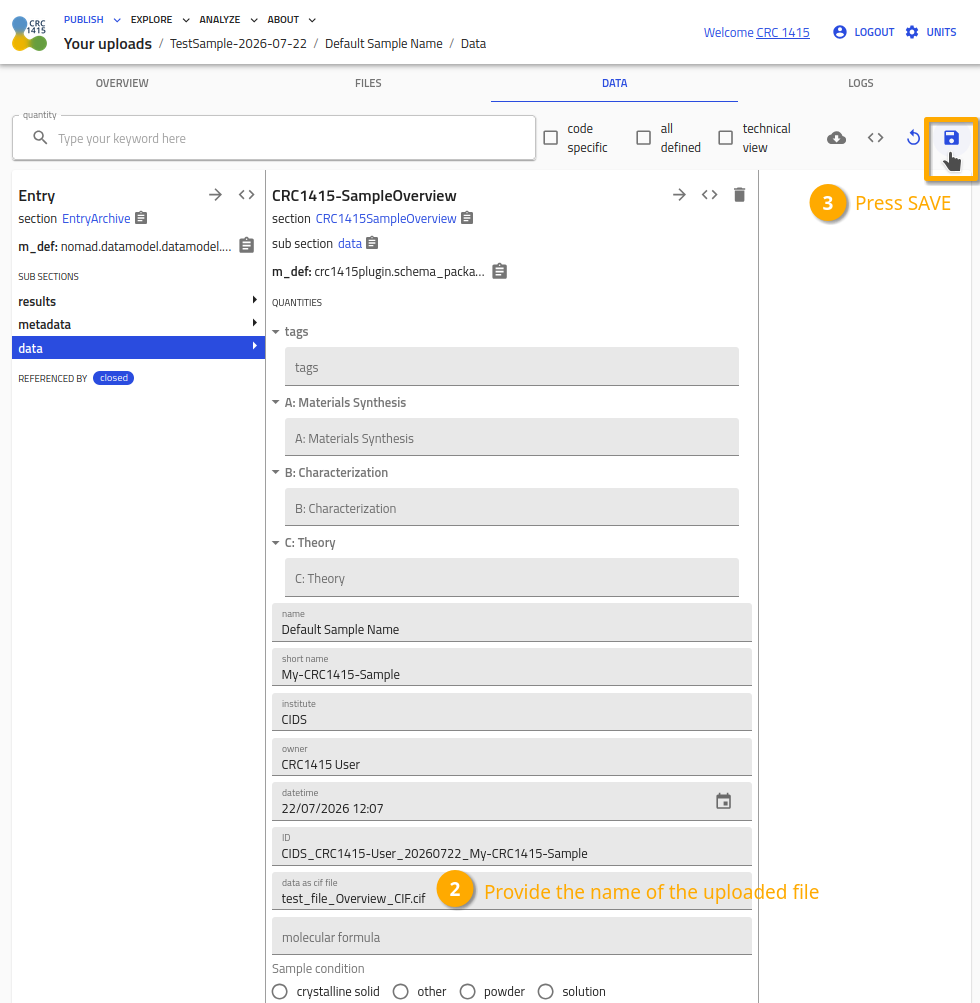
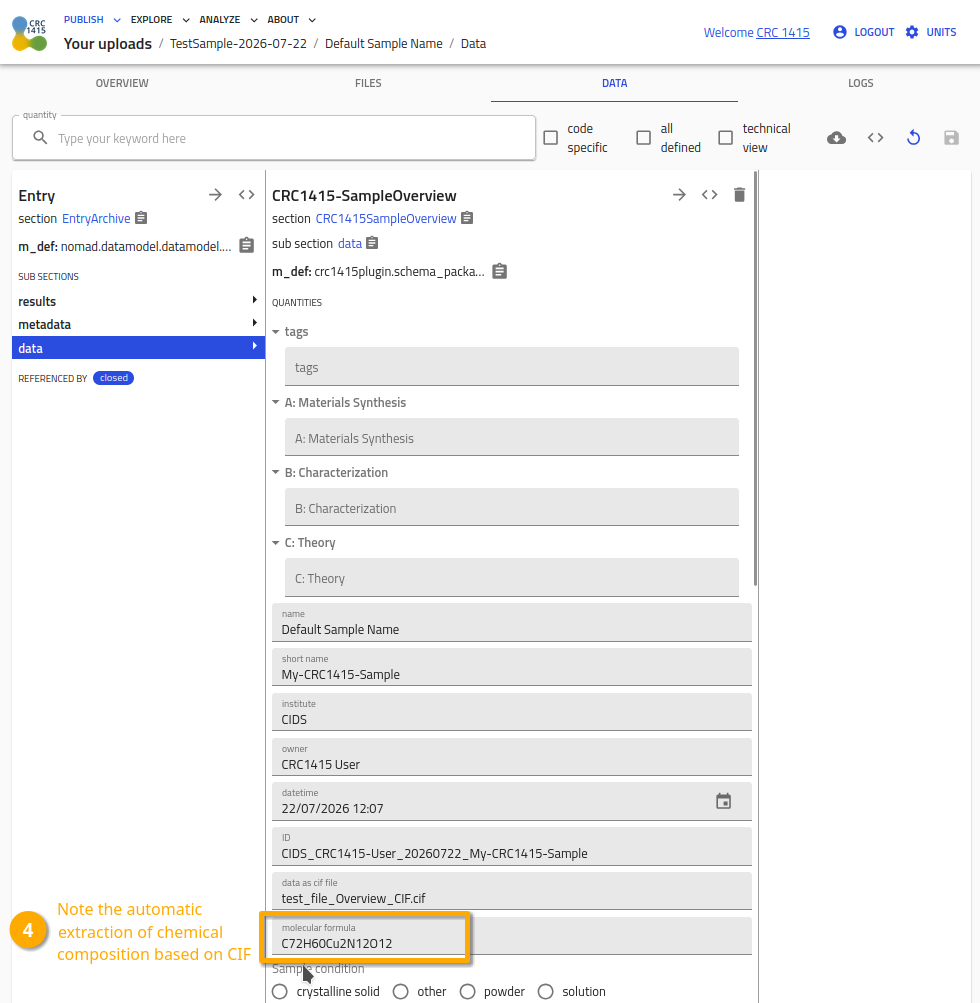
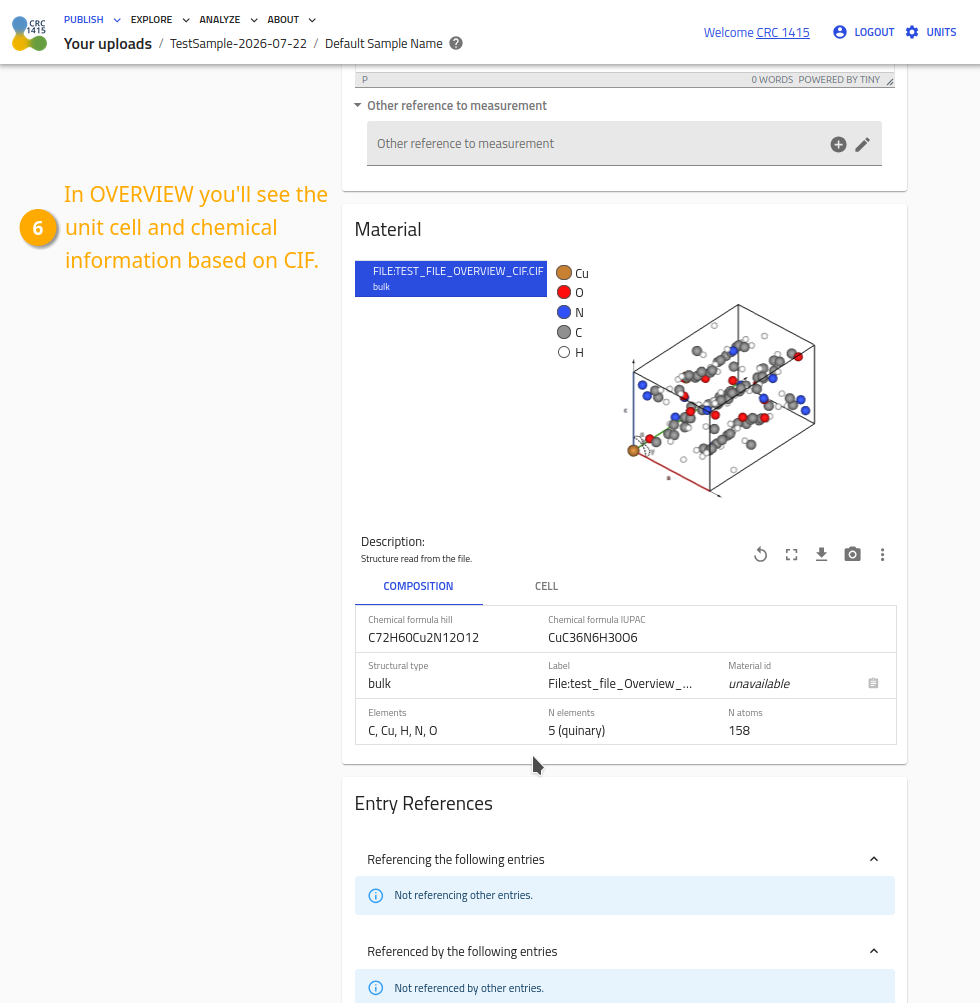
NOMAD has a built-in parser for .cif files and will automatically extract all relevant information:
- the unit cell
- the chemical composition
- the chemical formula
These information are very useful for further searching features based on elements or symmetry groups.
Use the arrow buttons ⬅️➡️ below to follow the steps for parsing your first CIF file.
Parsing data and metadata based on files
The NOMAD-CRC1415-Plugin has some custom file parser for the experiments in the CRC1415.
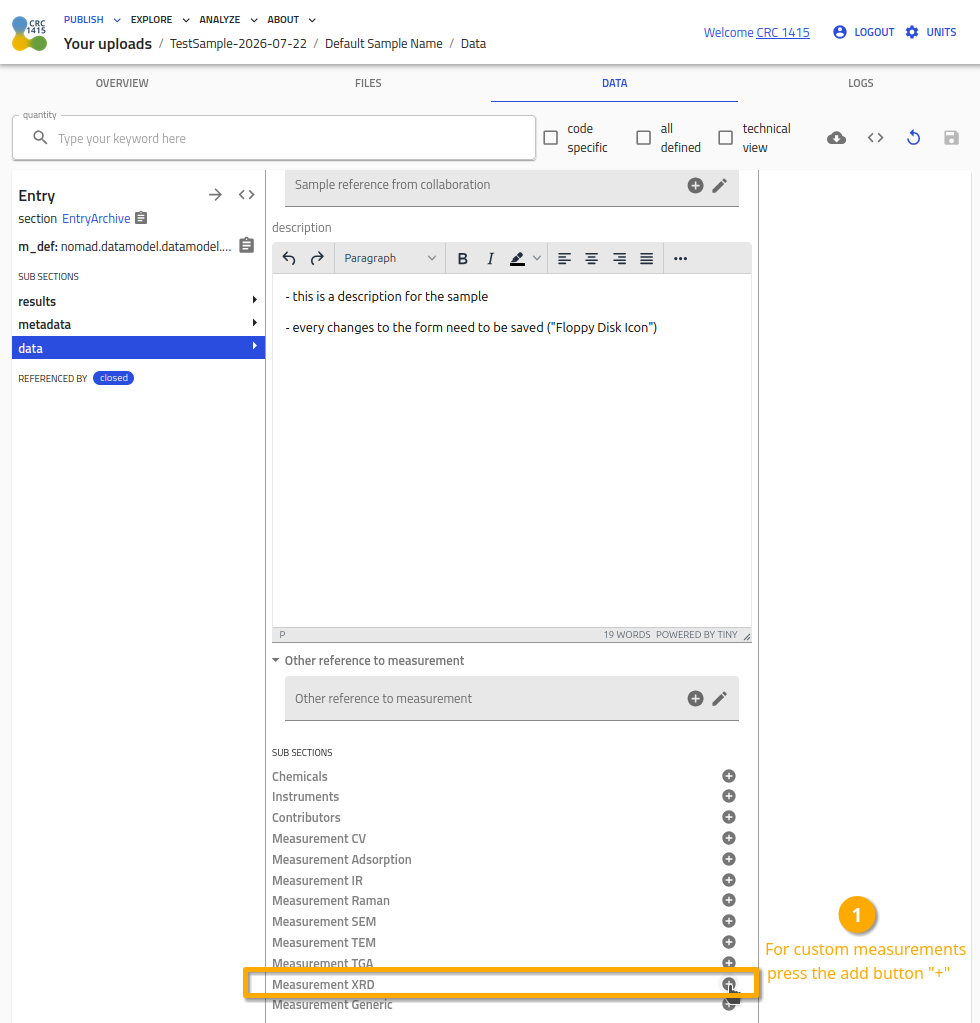
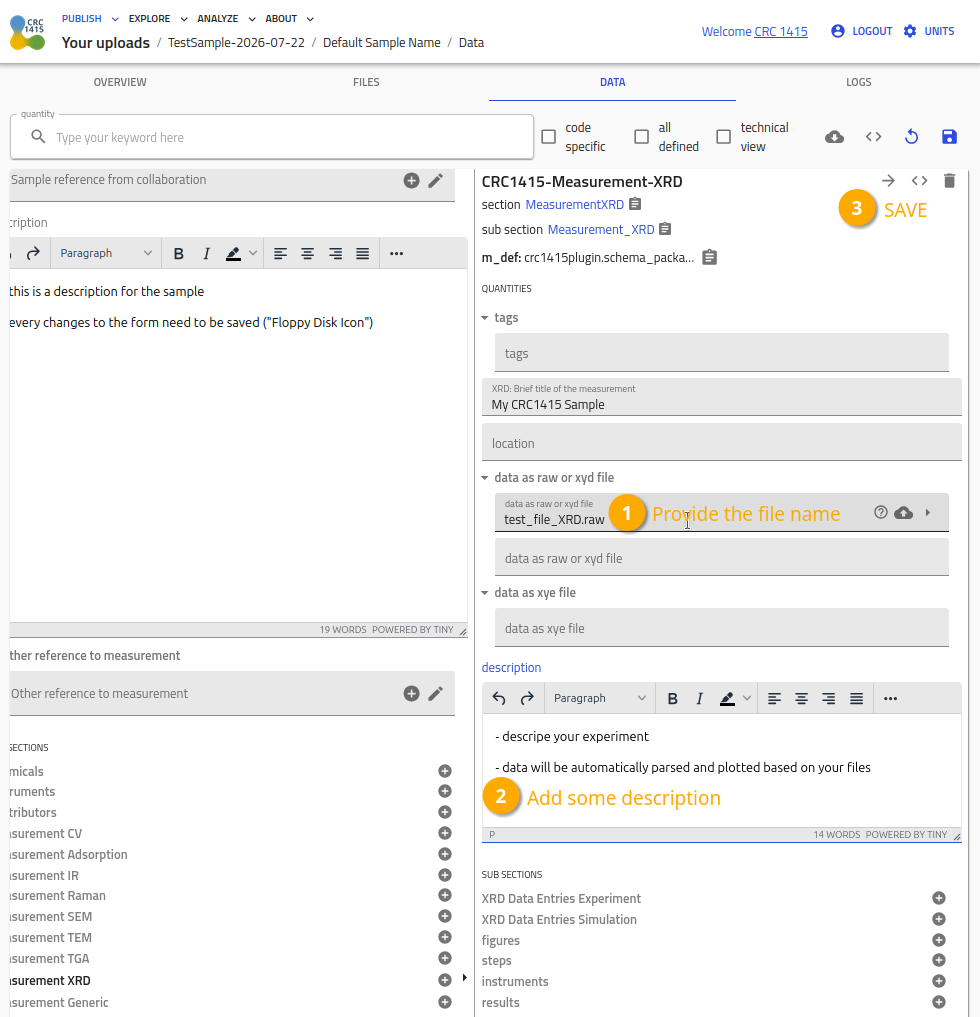
Usually you only need to select the measurement method and drag-and-drop the file to their metadata field.
The parsing starts and extract as much information as possible out of the file. Additionally, in most cases a interactive plot will be generated.
On the OVERVIEW tab, all information of the sample will be presented.
Use the arrow buttons ⬅️➡️ below to follow the steps for creating your first measurement entry.
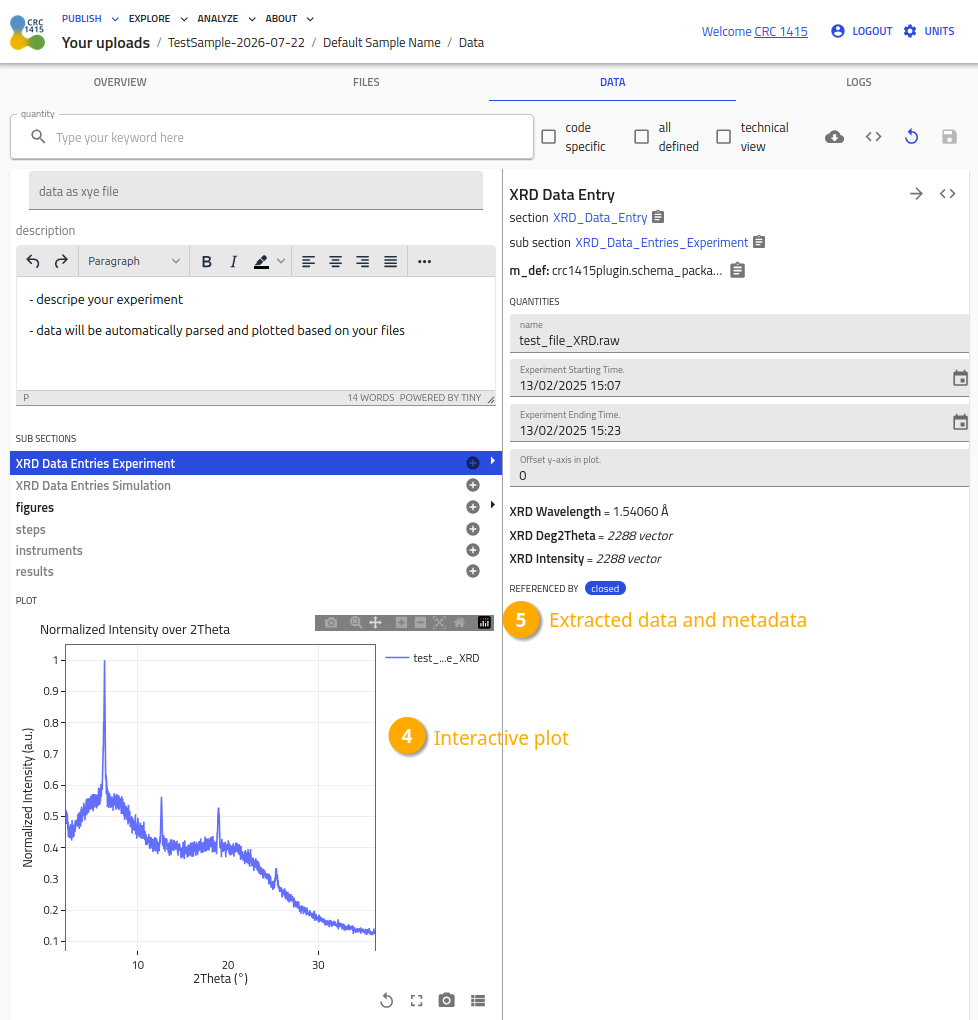
If you need a custom parser for your measurement, please contact the INF project of the CRC145.
Parsing Raman file
MeasurementRaman
Start with uploading the .tvb file. Follow the steps shown in the animation below.
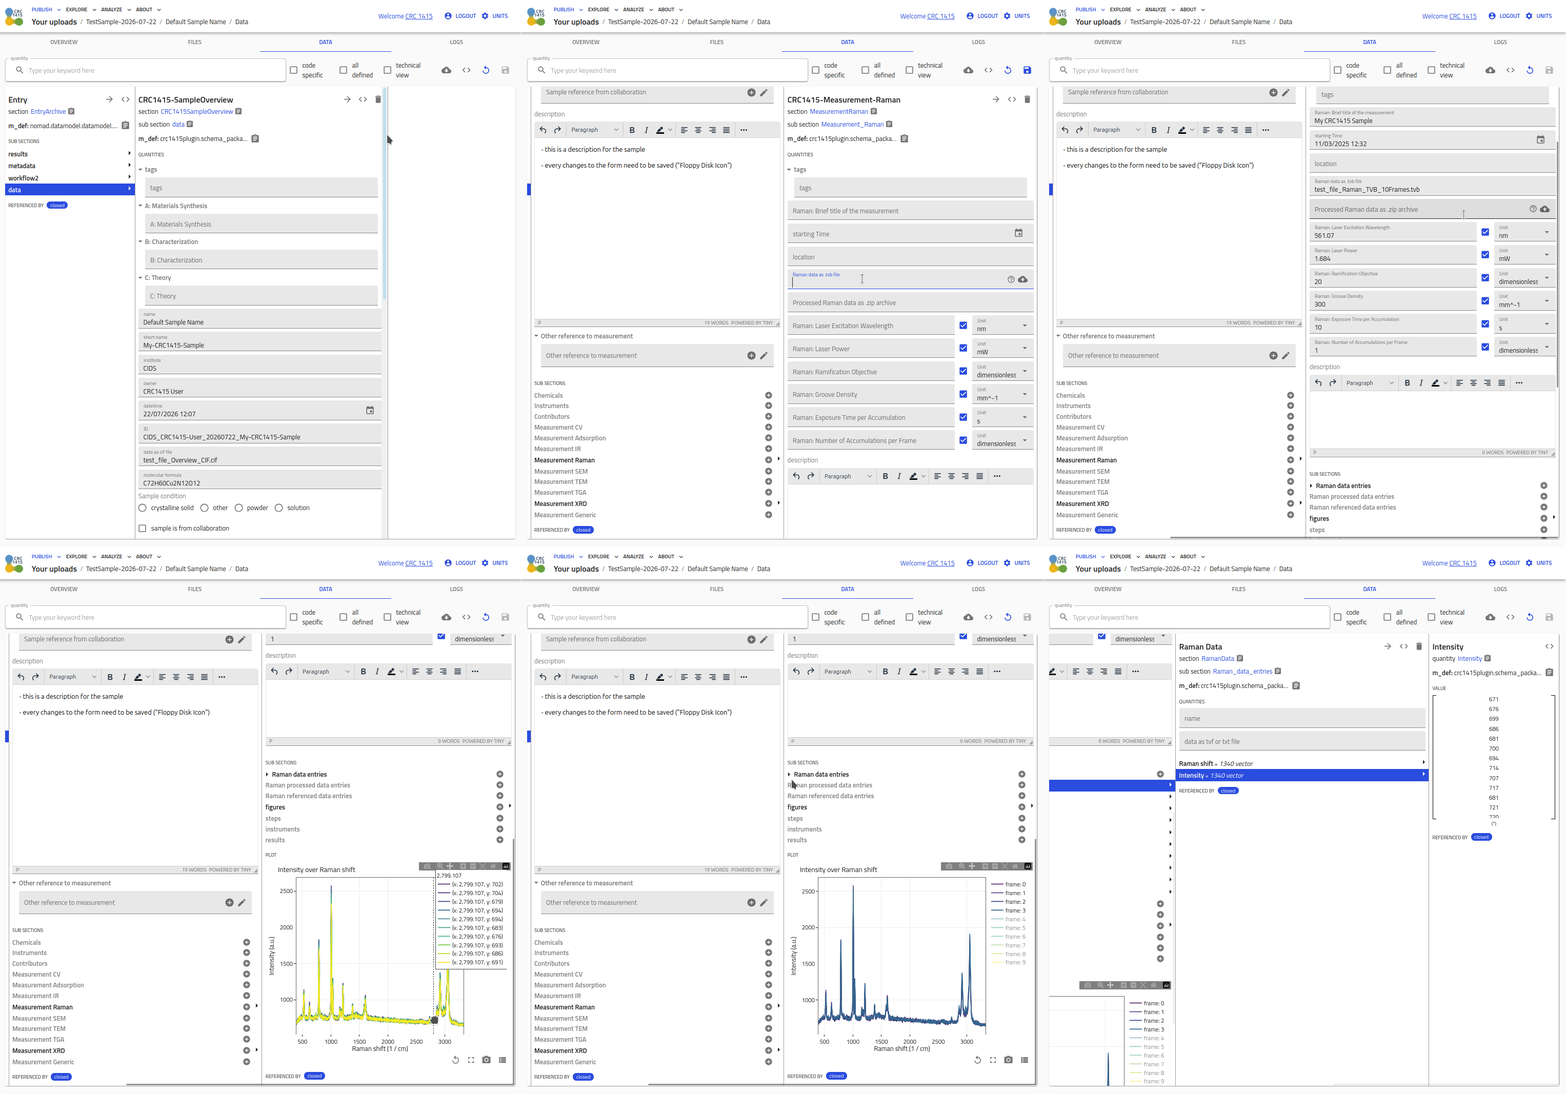
After providing the .tvb file and saving the entry, the (meta)data extraction will automatically start.
Showing images as preview
MeasurementImages
Start with uploading the .tif file. Follow the steps shown in the animation below.
Use the section MeasurementImages for preview of .tif, .tiff, .jpeg, .jpg or .png.
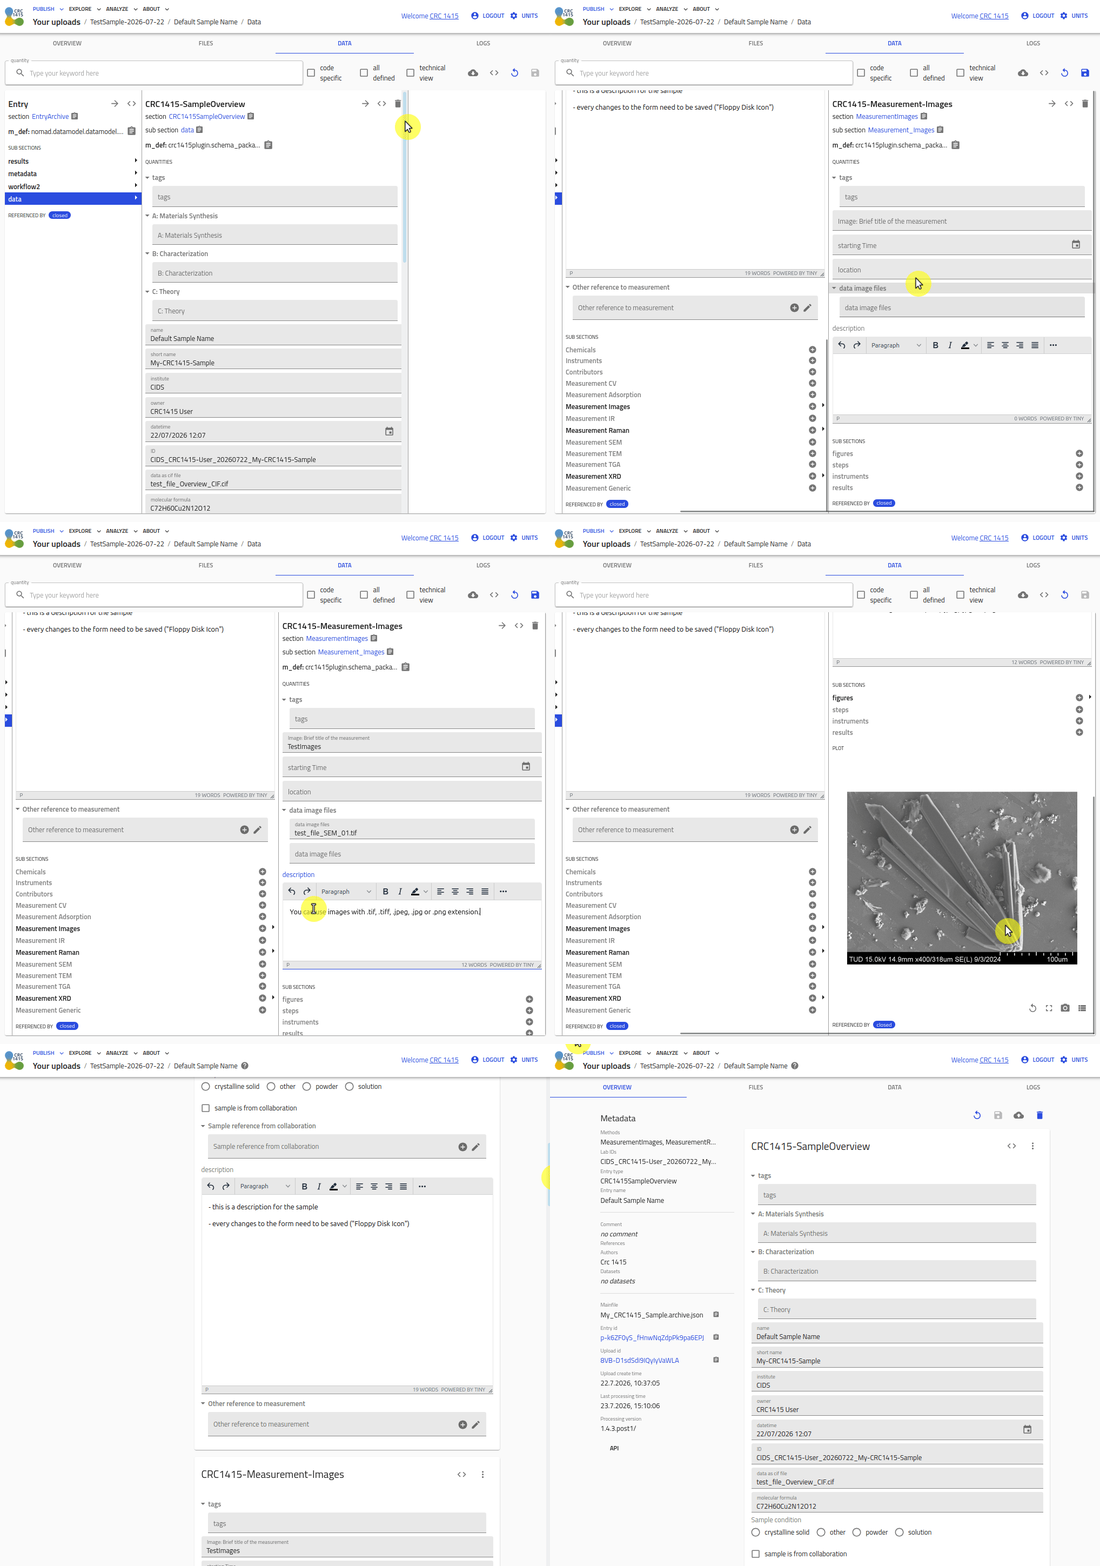
At the moment, there's no built-in support for rendering .tif files in NOMAD. Instead please use this plugin in the meantime.
Create datasets and get a DOI
You can organize several entries by grouping them into common datasets, making it easier to manage related data. Datasets are for organizing and referencing curated data. They do not affect how data is processed. Users can get a DOI for their datasets on https://nomad-lab.eu.
For creating datasets, please read the tutorial about it.
At the moment, there's no DOI creation service within NOMAD Oasis CRC1415. Please use the worldwide accessible NOMAD service or the CRC1415 Zenodo community. If you need help, please contact the INF project of the CRC1415.